Writing is a rough gig. Get paid where you can. Here’s a bunch of places that will pay professional rates for genre (fantasy/science fiction/horror) short stories. All these markets take (and actually publish) unsolicited submissions – you don’t need an agent, and you don’t need to have previously published works.
Remember to format your shit, write a simple cover letter, don’t send the same story to more than one place at a time, make sure submissions windows are actually open, and never respond to rejection letters ever. Have fun!
(Information gathered from both Submissions Grinder – an essential resource for people actively submitting their work – and my own excessive and somewhat ridiculous reading habits.)
Current as of May 2018. Markets are listed alphabetically. Detailed info below the cut.
1 yard of patterned fabric (I suggest a polka dot-type pattern so it looks like suction cups)
1 medium piece of black felt, 1 medium piece of white felt (for the eyes)
white thread, black thread and thread of the same color as the felt you’re using
pins
about 5 lbs. of stuffing
a couple big sheets of paper to draw your pattern
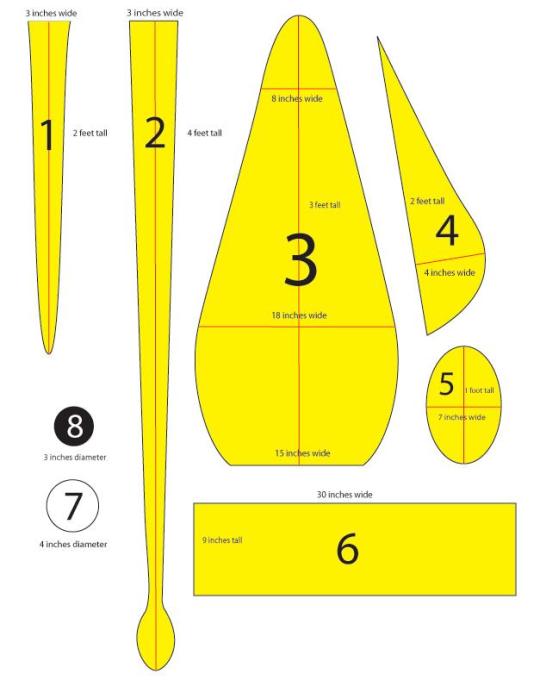
First, you need to draw out your patterns. Here’s a basic template to get you started, although most of the measurements are reasonably fudgeable. If in the likely event you don’t have any four-foot-long pieces of paper lying around, just tape a few pieces together.
Once you’ve drawn out your eight patterns, it’s time to cut the fabric. Pin the pattern to the fabric, laid flat, and cut out the following, leaving a half an inch or so of extra fabric around the edge of the pattern:
FOR THE ARMS: 8 felt and 8 fabric cutouts of piece 1
FOR THE, UH, LONGER ARMS: 2 felt and 2 fabric cutouts of piece 2
FOR THE BODY: 2 felt cutouts of piece 3
FOR THE FIN: 4 felt cutouts of piece 4
FOR THE HEAD: 1 felt cutouts of piece 6
FOR THE EYES: 2 white felt cutouts of piece 7 and 2 black felt cutouts of piece 8
So now you’ve got all your pieces ready, it’s time to start sewing them together. I did mine by hand because my sewing machine is busted and I get a kind of Zen buzz from sewing by hand, but if you have a non-busted one I recommend that you use it as it will be MUCH EASIER. You’re going to be sewing everything with the nice side of the fabric facing in, then turning it inside out to stuff it.
THE ARMS: (To make a quilted pattern that looks like suckers, see this other post). Pin together one patterned fabric piece 1 and one felt piece 1 (with the nice sides facing the inside). Sew down around the U-shape and back up, leaving the top open. Then turn the arm inside out, stuff it (it’s easiest to do both of these things if you sort of scrunch it up like you’re trying to put on a pair of tights, excuse the non-dude-friendly reference) and sew the top closed. Do the same for the other seven arms and rejoice in the fact that this is the most tedious part. Same deal with the two long arms, they’re just harder to stuff.
THE FINS: Pin together two of your piece 4s and sew together the curvy outer edge. Turn the piece inside out, so the seam you just sewed is on the inside, and start sewing up the other side, stuffing gradually as you go along. You should end up with a triangle-ish puffy thing. Repeat for the other two piece 4s.
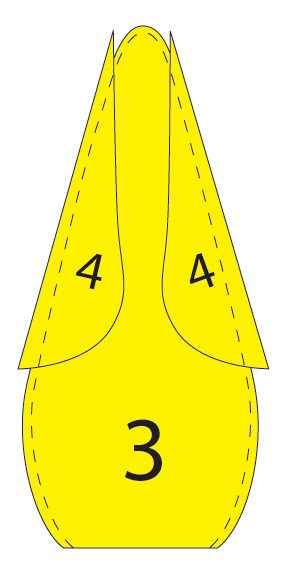
THE BODY: Put down one piece 3, then place the two fins you have down with the point up and the curvy side pointing in, then make a sandwich by putting the other piece 3 down on top. Pin it all together and sew around the edges with the two fins still inside, as shown. Turn it inside out and move on to…
THE HEAD: So take piece 6 and the ten arms you’ve already done. Lay the arms, fabric side facing you, out with the arms’ top seams in a line half an inch from the top of piece 6. The order should be arm arm arm arm BIG ARM arm arm arm arm BIG ARM. The legs should be almost entirely covering piece 6. Pin them in place and sew a straight line through the individual legs seams to attach the legs to piece 6.
When you pick up the other side of piece 6, you now have something resembling a really weird untied hula skirt. Sew together the two 9-inch ends of piece 6 with the fabric side of the arms on the outside, and keep it inside out for the moment.
PUTTING IT ALL TOGETHER: Fit the open end of the body through the arms (still fabric side facing out) and pull the edge all the way through the felt cylinder so it’s even with the edge that DOESN’T have arms attached to it. Sew around the diameters of the head cylinder and the body cylinder to attach them, then pull the legs down over the head and you’re almost done!
Stuff the body, then seal it off by sewing piece 5 over the open end (even if you do have a functional sewing machine, you’ll probably have to do this part by hand).
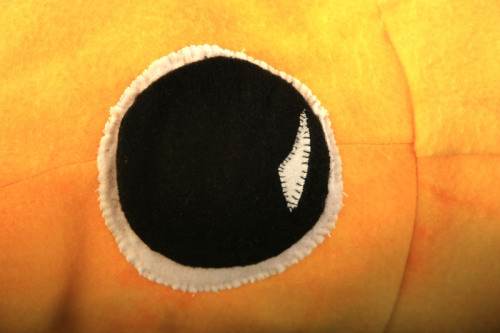
THE EYES: Sew the black circles on the white circles and whipstitch the eyes onto the head. You do this last because you can’t tell where they’re going to end up on the end product if you put them on before stuffing the body.
Middle Ages (or Medieval period), lasted from the 5th to the 15th century. It began with the collapse of the Western Roman Empire and merged into the Renaissance and the Age of Discovery. The Middle Ages is the middle period of the three traditional divisions of Western history: Antiquity, Medieval period, and Modern period. The Medieval period is itself subdivided into the Early, the High, and the Late Middle Ages. [1] [2]
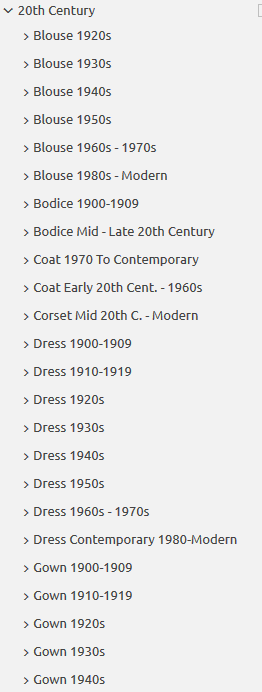
Do you design a lot of characters living in not-modern eras and you’re tired of combing through google for the perfect outfit references? Well I got good news for you kiddo, this website has you covered! Originally @modmad made a post about it, but her link stopped working and I managed to fix it, so here’s a new post. Basically, this is a costume rental website for plays and stage shows and what not, they have outfits for several different decades from medieval to the 1980s. LOOK AT THIS SELECTION:
OPEN ANY CATEGORY AND OH LORDY–
There’s a lot of really specific stuff in here, I design a lot of 1930s characters for my ask blog and with more chapters on the way for the game it belongs to I’m gonna be designing more, and this website is going to be an invaluable reference. I hope this can be useful to my other fellow artists as well! 🙂
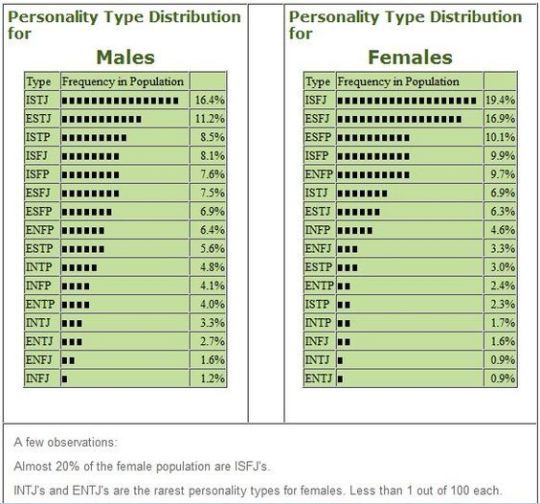
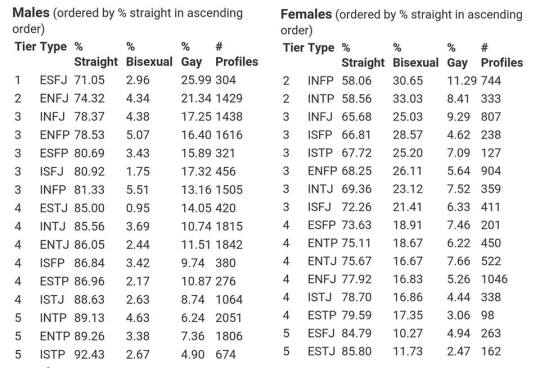
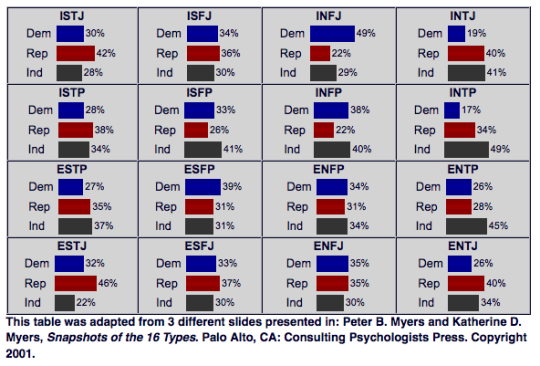
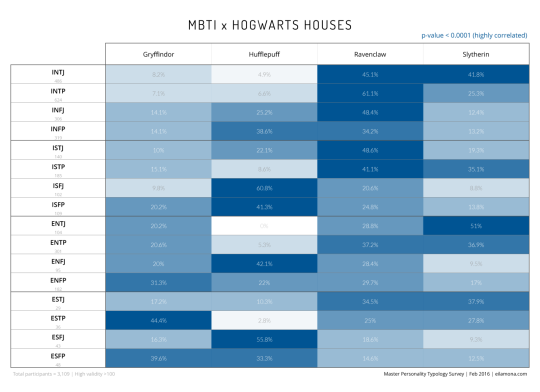
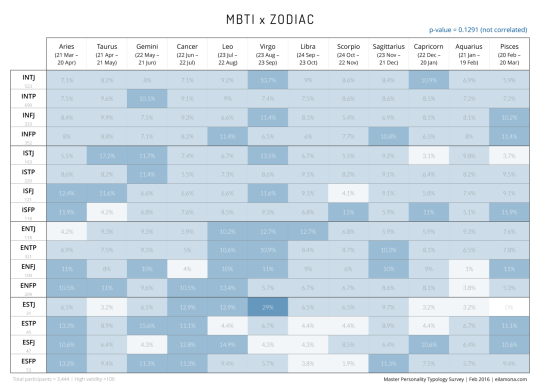
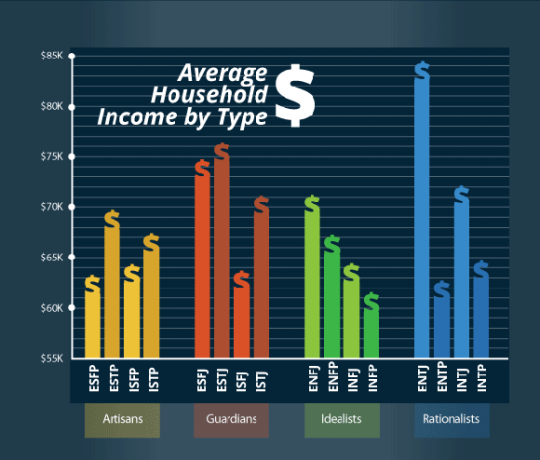
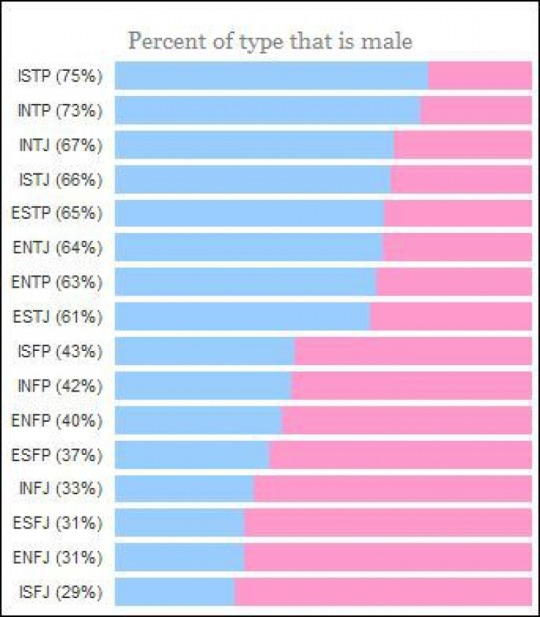
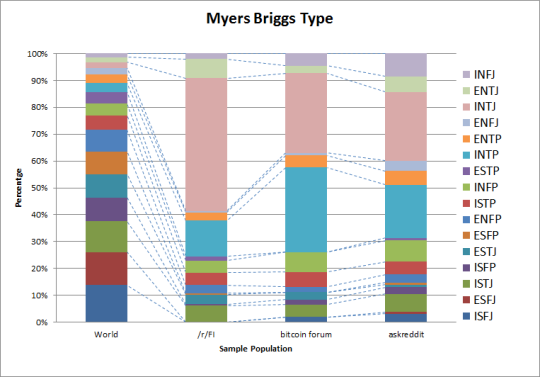
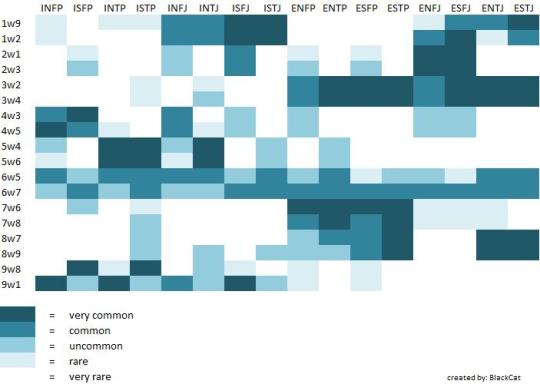
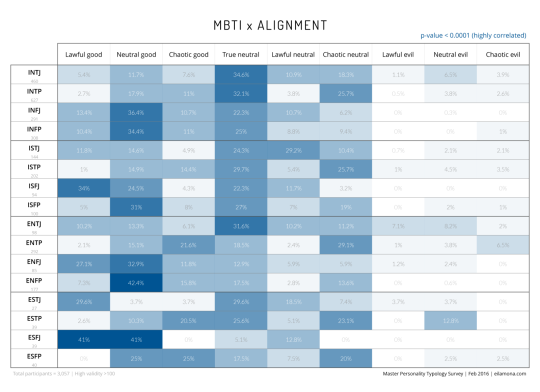
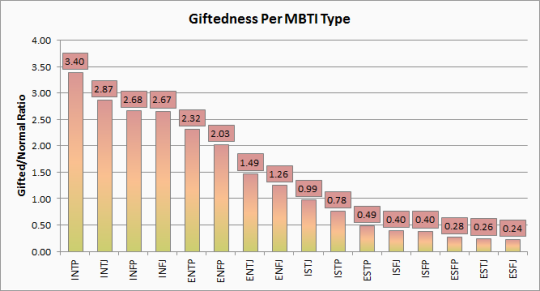
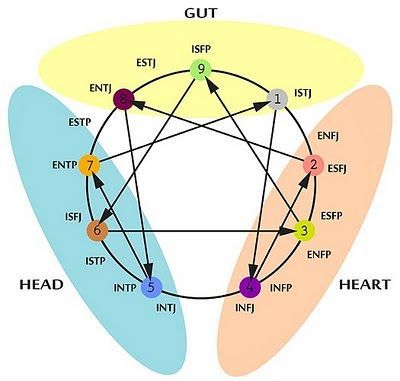
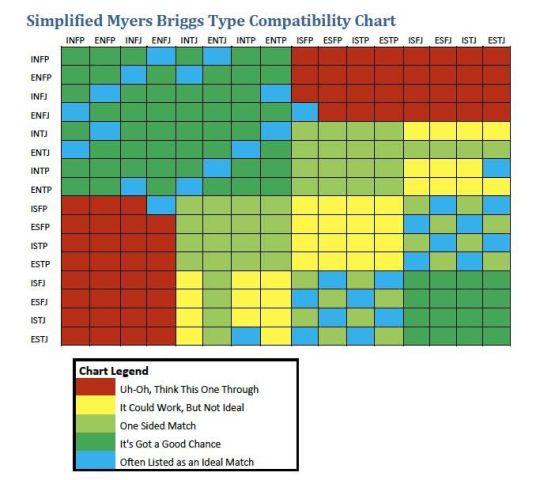
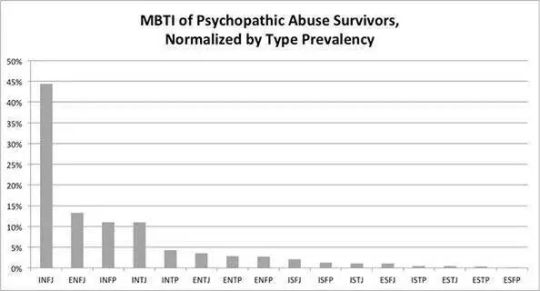
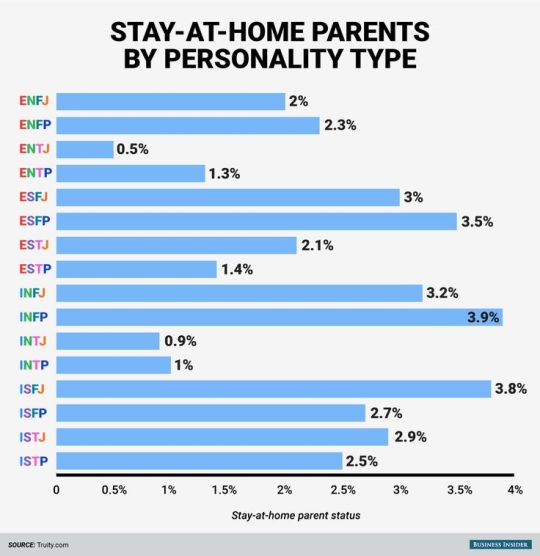
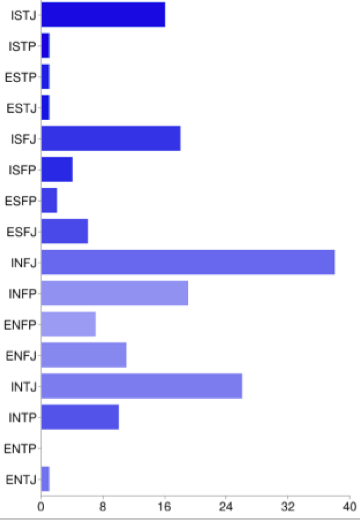
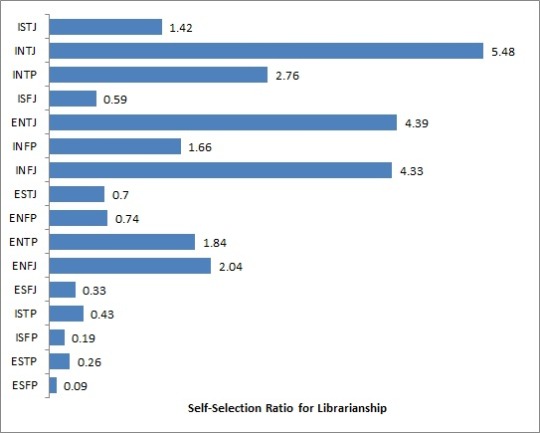
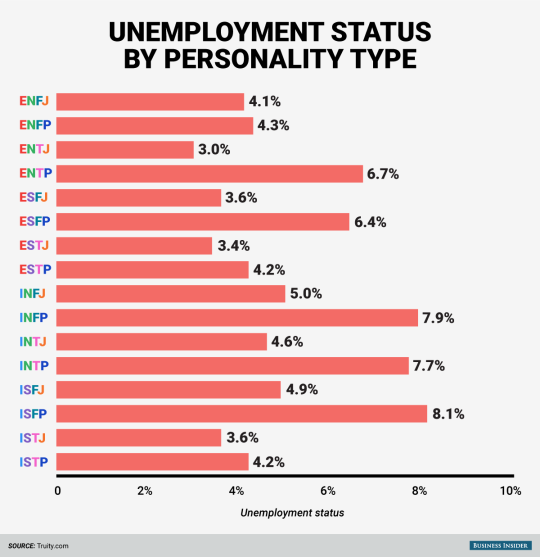
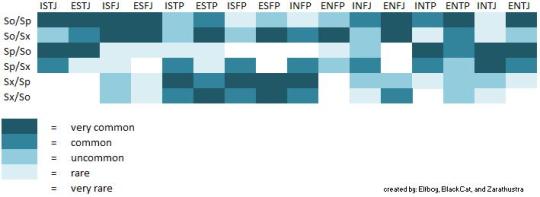
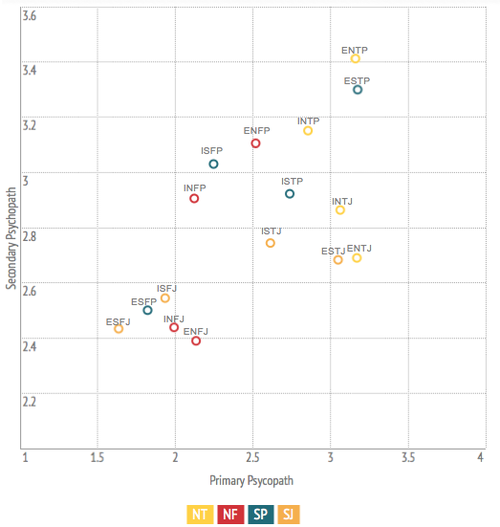
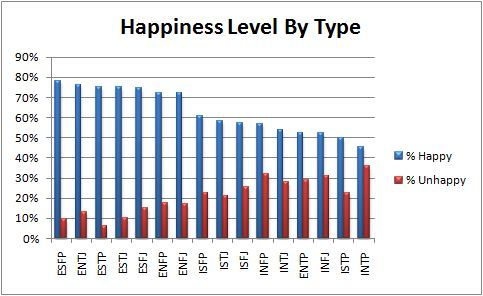
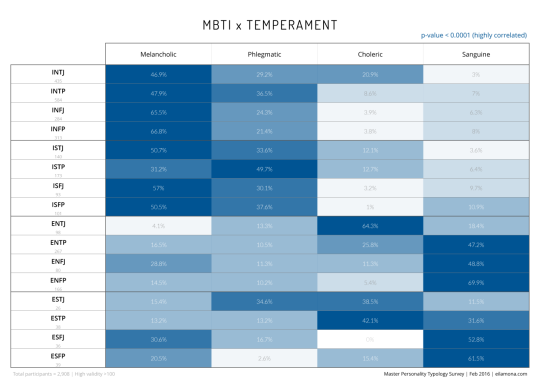
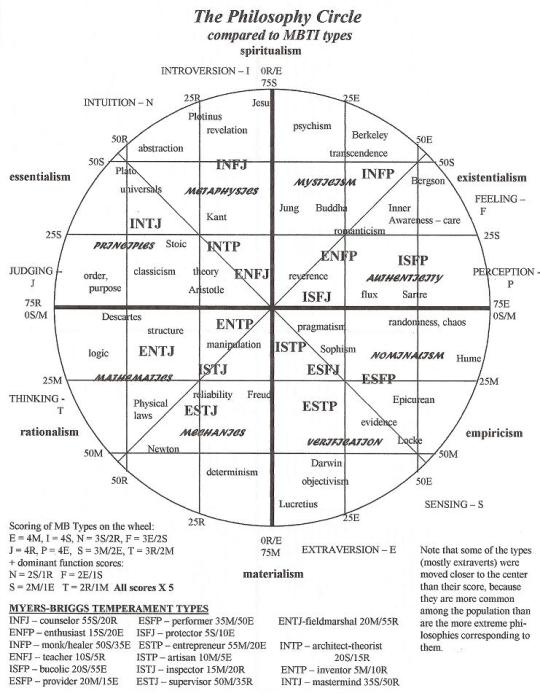
Have you ever been bored on a Tuesday evening just sitting around and thinking to yourself, “Boy, I sure wish I had a shit ton of random MBTI-related charts, statistics, and surveys to look at”? SAY NO MORE, FAM. I have compiled here for you today the world’s finest assortment of completely useless MBTI-related data, all for your viewing (and procrastinating) pleasure. Enjoy!
hey!! sorry to hijack this post, but there are a bunch of ways you can make videogames without knowing shit about computers!!
for starters, there’s Twine, which is fucking great for making all kinds of interactive experiences (it’s what Crystal Warrior Ke$ha was made in so you KNOW it’s good) at all skill levels (i picked it up and made a game in two minutes a few nights ago)
if you want a bit more involved experience there’s Inform 7 which is a simple language for text-based adventure games that reads like slightly-weird English and also relatively easy to learn
you can do some pretty fucking cool stuff with Unity (my personal engine of choice) but you may need to dig a bit farther to get at the good stuff. there’s lots of really good presets though (i made an entire game just mixing and matching pre-existing templates and adding in my own art, won an award at a game jam for that one) and if you want help the community’s pretty dang friendly from what i’ve seen!
this is just a taste of what’s out there from what i’ve seen, but there’s so many cool resources out there. if anyone wants help getting started, i’m around to give you a leg up on making something in the coolest, most unexplored art medium around!
I’m addin’ to this post because lowering the barrier to entry for making games is super important to me!!!! If y’all have any questions about making games, you’re welcome to come and ask! I made this list a while back with some friends, so it has some of the programs John already mentioned.
2D Editors:
GameMaker : Potential for pure drag-and-drop “programming”. It is recommended to read-up on the program’s functions to make good use of it. Good for prototyping. Uses its own language called Game Maker Language (GML) that is similar to a C language (e.g. C++ or C#). For both Mac and PC; free version available.
Construct2 : Drag and drop level editor that uses an “If-Then” event sheet structure for programming. Good for prototyping and for beginners. For PC; free version available.
GameSalad : Drag and drop with no code requirement. Good for programming. For both Mac and PC; free version available.
Solpeo : HTML5 based game engine for 2D and isometric game development. Some programming knowledge needed. Platforms supported: Chrome, Firefox, Internet Explorer 9+. Free version available.
Stencyl : Drag and Drop “programming,” templates you can edit the variables/values for.
Scratch : Lego-block-style coding platform by MIT; totally free and a great intro to thinking in code. Very kid-friendly and comes with a community site. Browser version available.
3D Editors:
Unity : 3D editor that creates 3D games. Can build games for browser, as an app, or for mobile devices (iOS and Android). For both Mac and PC; free version available.
UDK (Unreal Development Kit) : Full-fledged, highly advanced editor. Features a complete set of tools that go from level design to visual scripting to cut-scene creation. Uses it’s own programming language called Unreal Script that can be arranged with Kismet, a visual code editor. For Mac and PC; free.
2D Art/Animation Software:
GIMP : Free photo editing and digital painting software.
Easy Paint Tool SAI : Free digital painting software with a UI similar to Photoshop.
Mischief : Free digital painting software with an endless canvas.
3D Art/Animation Software:
Sculptris : From the company that created Zbrush, this free software is ideal for beginning 3D sculptors.
Maya : Animation, VFX, lighting, and rendering software.
Magical Voxel : Voxel Art (3D Pixel Art). Very intuitive and quick to pick up.
SketchUp : Architectural modeling software, great for creating 3D environments and buildings. Free version available.
Text-Based Games:
Twine : Create interactive text stories using Twine’s visual map system that links your game together. Easy to learn and use. End result is browser-based. For Mac and PC; free.
Quest : Interactive text stories that you can build in-browser.
Ren’Py : Create visual novels using a modified version of Python that reads like a combination of stage directions and a CYOA novel. For PC, Mac, and Linux; free.
Audio Resources/Editors:
Indie Game Music : This site offers free indie music with no need to worry about royalties or licenses.
Audacity : A free, open-source, cross-platform sound editor that allows you to record and arrange sound.
Super Flash Bros. : This site allows you to record theremin-like (8bit) sounds and export them as .wav files for your games.
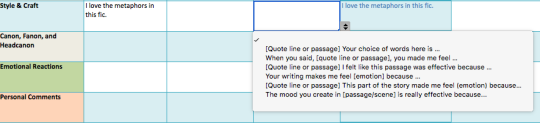
The @longlivefeedback comment builder is a tool created to help fanfiction readers respond to stories and communicate with authors. We recognize that commenting is a learned skill, and that there are many reasons why an individual may find commenting particularly difficult or daunting.
The LLF Comment Builder is designed to help users learn to comment using instructional scaffolding, as well as to remove other barriers to leaving feedback such as dysexecutive syndrome, anxiety, mobility issues that make typing long reviews difficult (particularly on mobile), language fluency, and mobile commenting functionality in general… or maybe you just aren’t sure what to say.